
- Published on
How to Configure OIDC with Terraform for GitHub Enterprise Server
- Name
- Luca Cavallin
Let's say you have a GitHub Enterprise Server instance and you want to configure GitHub Actions on it. One piece of this configuration is to provide a way for Actions to store log information, artifacts, and packages. GitHub Actions supports storing this data in AWS S3, Azure Blob Storage, or Google Cloud Storage. It is possible for GitHub Enterprise Server to use credentials-based authentication for getting access to these storage services, but it is recommended to use OpenID Connect (OIDC) instead to reduce the risk of credentials being compromised.
In this blog post, I'll show you how to configure OIDC with Terraform for GitHub Enterprise Server. OIDC could obviously be setup manually, but using Terraform to do it has a few advantages:
- It's much quicker than creating resources manually.
- It's easier to keep track of changes to the configuration and to replicate the configuration in other environments.
- Once the configuration is in place, it's hard to accidentally break it.
What is GitHub Enterprise Server and GitHub Actions?
Before we get into the details of how to configure OIDC with Terraform for GitHub Enterprise Server, let's first understand what GitHub Enterprise Server and GitHub Actions are. GitHub Enterprise Server is the on-premises version of GitHub - imagine GitHub.com but installed on a company's own servers: it's something businesses would use if they want to have more control and keep their code private. GitHub Actions is a feature in GitHub that lets you automate tasks. For example, when someone adds new code to a project, GitHub Actions can automatically run checks against this code, build the application and deploy it, and pretty much anything else you could automate with scripts.
Why use OIDC?
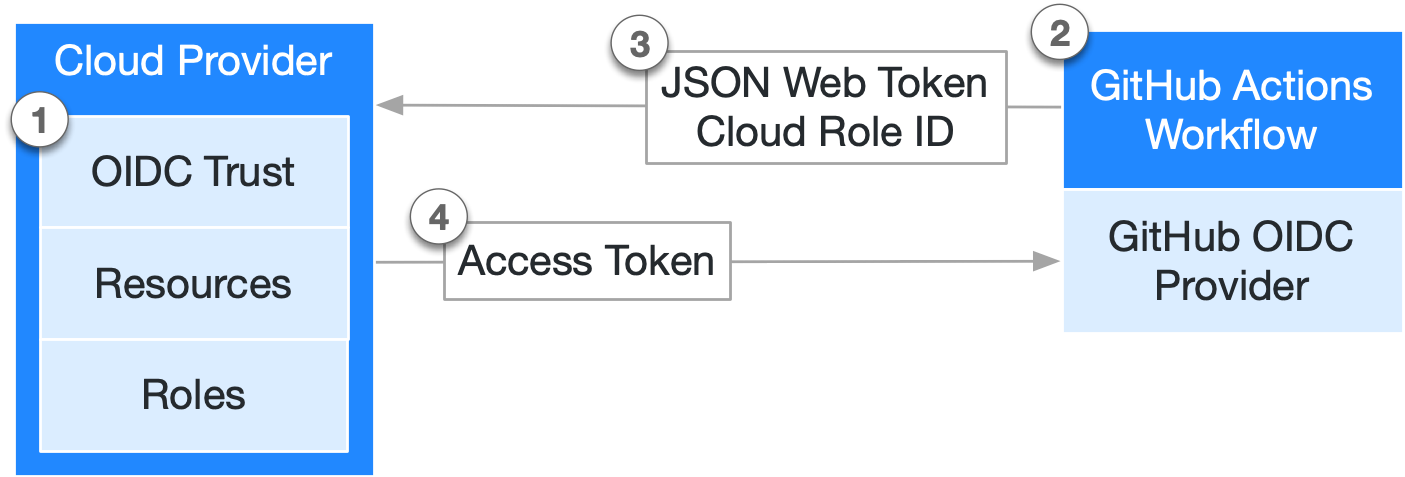
OpenID Connect (OIDC) is an authentication protocol that extends OAuth 2.0, providing a solid and standardized method for authentication. OIDC allows a client application to request and receive information about an authenticated user's session and identity. This is achieved through a secure token exchange, often involving an ID token in the JWT (JSON Web Token) format. In short, OIDC lets you authenticate users without having to store their credentials.
Both GitHub Enterprise Server and all major cloud providers support OIDC. We just need to provide the configuration to make them talk. Here's a simple diagram of how it works:
How to configure OIDC with Terraform for GitHub Enterprise Server
Configuring cloud resources to use GitHub Actions on GitHub Enterprise Server with OIDC can be a lengthy and challenging task due to stringent security demands that require precise configuration. To make the process easier, I started the lucavallin/tf-ghes-oidc project. This repository, although not intended for production use, includes Terraform configurations necessary for creating resources across the top three enterprise cloud services: Azure, Amazon Web Services (AWS), and Google Cloud Platform (GCP).
This Terraform configuration is designed to be executed by an individual user ( rather than by a Service Account) who is logged into their chosen cloud provider through the corresponding CLI on Linux.
To get started, you need to have a project or a similar setup on either Azure, AWS, or Google Cloud, specifically for creating resources. Additionally, you need access to the GitHub Enterprise Server instance, both through its user interface and over SSH. Make sure your SSH keys are properly set up in the instance's Management Console to ensure this access.
Usage
To deploy the resources, follow these steps:
- Install Terraform and the cloud provider CLIs by executing the
scripts/install.shscript. If needed, refresh the console profile file (such as~/.bashrc) to enable the use of the CLI without requiring the full path. - Initialize the (chosen) cloud CLI(s) and authenticate with your cloud provider(s).
- Navigate to the
srcdirectory. - Run
terraform initto initialize Terraform and install necessary dependencies. - The default Terraform
backendis set tolocal, meaning Terraform state is stored locally. This can be altered to any supported backend. - Change the name of
terraform.tfvars.exampletoterraform.tfvarsand modify the variables to suit your setup. Theterraform.tfvarsfile holds the configuration for the Terraform files. - Execute
terraform plan -out=planto prepare for resource creation. This plan is saved in theplanfile for the next step. - Use
terraform apply planto initiate the creation of the resources. - The configuration necessary for enabling Actions on GitHub Enterprise Server with OIDC in the GitHub Enterprise Server Management Console is provided at the conclusion of the process, as dictated by the outputs specified in
src/outputs.tf. - Additional instructions specific to each cloud provider are detailed further below.
Note: If you're just experimenting with GitHub Actions on GitHub Enterprise Server with OIDC, use
terraform destroyto delete all resources created by Terraform to prevent unwanted expenses.
Useful Information: The configuration in the repository is verified through a GitHub Action in .github/terraform.yml, which ensures its accuracy.
Variables
The Terraform setup requires values for the variables listed in src/variables.tf. The file terraform.tfvars.example serves as a guide. By renaming terraform.tfvars.example to terraform.tfvars, you can supply the necessary information as follows:
GitHub Enterprise Server_NAME: Name of the GitHub Enterprise Server instance (e.g. my-GitHub Enterprise Server-instance)GitHub Enterprise Server_HOSTNAME: URL of the GitHub Enterprise Server instance without 'https://' (e.g. my-GitHub Enterprise Server-instance.com)AZURE_SUBSCRIPTION_ID: ID of the Azure Subscription to useAZURE_REGION: Region for the Azure Storage Account (defaults toWest Europe)AZURE_STORAGE_ACCOUNT_TIER: Tier for the Azure Storage Account (defaults toStandard)AZURE_STORAGE_ACCOUNT_REPLICATION_TYPE: Replication Type for Azure Storage Account (defaults toLRS)AWS_REGION: AWS Region for OIDC Resources (defaults toeu-north-1)AWS_OIDC_THUMBPRINT: Thumbprint of the GitHub Enterprise Server Instance to for OIDC setup on AWSGCP_PROJECT_ID: ID of the Google Cloud Project to useGCP_REGION: Google Cloud Region for OIDC Resources (defaults toEUROPE-WEST4)
Cloud Providers
Azure
Prior to starting resource creation in Azure, follow these preliminary steps:
- Ensure the availability of an Azure subscription for your use.
- Execute
az login --use-device-codeto authenticate with Azure. - If the specific Azure subscription you wish to use is not already active, set it using
az account set --subscription="SUBSCRIPTION_ID". - Modify the
AZURE_SUBSCRIPTION_IDvariable in theterraform.tfvarsfile to match the ID of your chosen Azure subscription for resource deployment.
The required resources for Azure are detailed in the src/azure.tf file. The configuration essential for configuring Actions on GitHub Enterprise Server with OIDC in the Management Console is produced as outputs: azure_tenant_id, azure_client_id, azure_storage_account_name, and azure_blob_endpoint_suffix.
Terraform creates the following resources for Azure:
- A Resource Group for the OIDC resources
- A Storage Account to be used for Actions data
- An Azure AD Application for GitHub Enterprise Server
- A Service Principal for the Azure AD Application
- A Role Assignment for the Service Principal
AWS
To set up the resources on AWS, you need to follow these steps:
- In AWS, create a set of
Access Keysfor your account. You can find this in theSecurity Credentialssection (see the documentation). - Run the
aws configurecommand and enter theAccess Keysyou just created. This step links the AWS CLI with your AWS account and creates the~/.aws/configand~/.aws/credentialsfiles required by the Terraform AWS provider. - Create a new Thumbprint for your GitHub Enterprise Server instance as outlined in the documentation. This Thumbprint is necessary for the OIDC setup.
This repository also provides the scripts/thumbprint.sh script which generates the Thumbprint. Use it as follows:
# ./script/thumbprint.sh <GitHub Enterprise Server_HOSTNAME>
$ ./script/thumbprint.sh my-GitHub Enterprise Server-instance.example.com
$ GitHub Enterprise Server Thumbprint: AB1234567890ABCDEF1234567890ABCDEF123456 # Thumbprint
- Update the
AWS_REGIONandAWS_OIDC_THUMBPRINTvariables in theterraform.tfvarsfile. Set them to your chosen AWS region for deploying resources and the Thumbprint of the GitHub Enterprise Server instance for the OIDC setup.
The required resources for AWS are detailed in the src/aws.tf file. The configuration essential for configuring Actions on GitHub Enterprise Server with OIDC in the Management Console is produced as outputs: aws_s3_bucket, aws_role and aws_region.
Terraform creates the following resources for AWS:
- An S3 Bucket to be used for Actions data
- An OpenID Connect Provider for GitHub Enterprise Server
- An IAM Role for GitHub Enterprise Server
- An IAM Policy for the IAM Role
Google Cloud
Before initiating resource creation in a Google Cloud project, you should follow these preparatory steps:
- Make sure that the project is linked to a Billing Account.
- Execute
gcloud initto start the Google Cloud CLI and choose the project where you plan to deploy the resources. - Run
gcloud auth application-default loginfor authenticating the CLI with Google Cloud. - Modify the
GCP_PROJECT_IDvariable in theterraform.tfvarsfile to match the ID of your chosen Google Cloud project for resource deployment.
The required resources for Google Cloud are detailed in the src/gcp.tf file. The configuration essential for configuring Actions on GitHub Enterprise Server with OIDC in the Management Console is produced as outputs: gcp_service_url, gcp_bucket_name, gcp_workload_identity_provider_id, and gcp_service_account.
Terraform does the following for Google Cloud:
- It enables the services
iamcredentials.googleapis.comandstorage.googleapis.comfor the project. - It creates a Workload Identity Pool (Provider) for GitHub Enterprise Server
- It creates a Service Account for GitHub Enterprise Server
- It assigns the roles
roles/iam.workloadIdentityUser,roles/storage.objectAdminandroles/iam.serviceAccountTokenCreatorto the Service Account - It creates a Storage Bucket to be used for Actions data
Improvements to the Terraform Configuration
In the future, I could make things better by splitting the settings for different cloud services like Azure, AWS, and Google Cloud into their own separate parts. This would make it easier and more flexible to work with each one on its own. It would help users handle their settings for each cloud service by themselves. This way, if you're just working with one cloud service, things would be smoother.
Summary
In this blog post I guided you through configuring OpenID Connect (OIDC) with Terraform for GitHub Enterprise Server. GitHub Enterprise Server is like a private GitHub, installed on a company's own servers for more control and privacy. GitHub Actions, a feature of the product, automates tasks like code checks and deployments. The post explains how OIDC, an authentication protocol extending OAuth 2.0, enhances security by allowing user authentication without storing credentials. It's supported by GitHub Enterprise Server and major cloud providers. Finally we took a look at lucavallin/tf-ghes-oidc, a Terraform project to simplify configuring OIDC across top cloud services like Azure, AWS, and GCP. The repository provides detailed steps for setting up the Terraform environment and executing configurations, along with specific instructions for each cloud provider, emphasizing the ease, security, and efficiency of this approach.